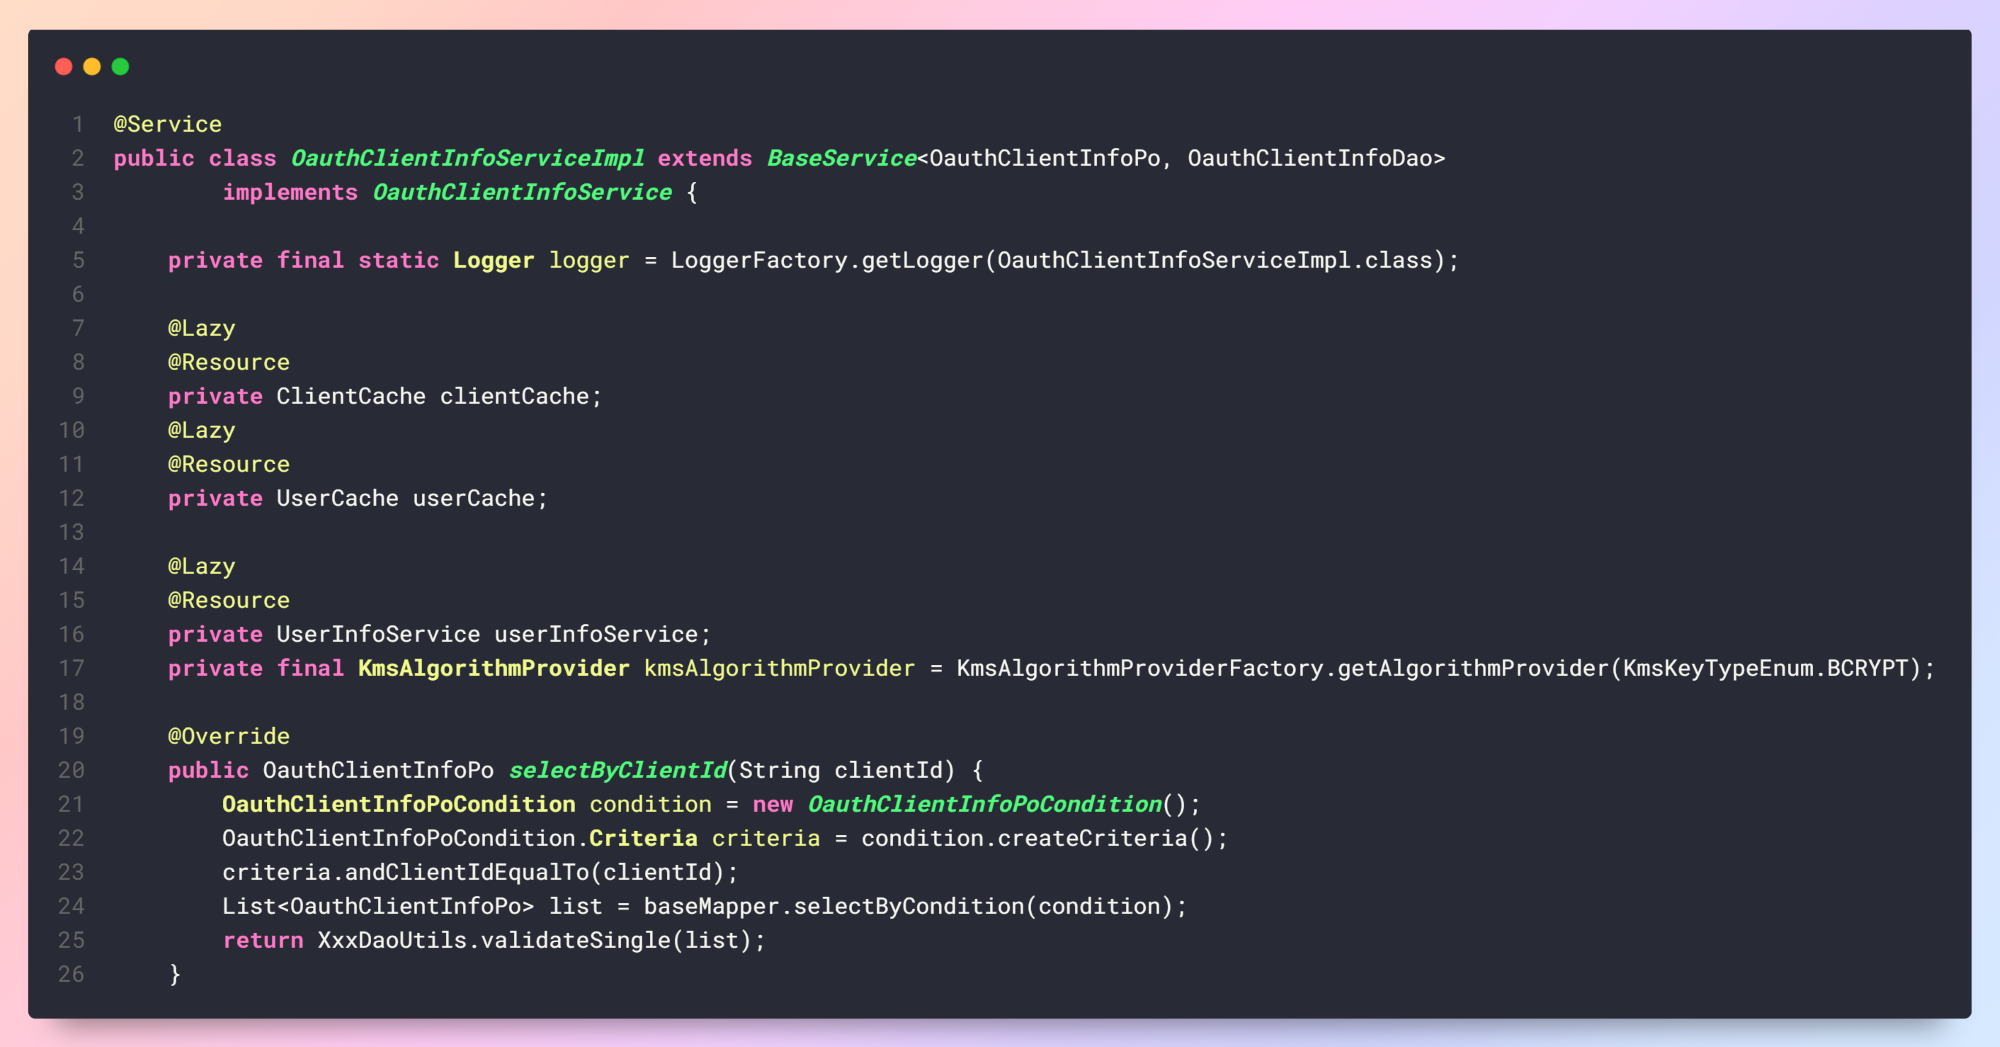
这里的代码生产思路限制在持久层,也就是主要用来产生 DAO 和 PO 。主要作用是根据数据库设计反转出相关代码,并使用规范设计出一系列数据操作接口。以便在实际使用中统一数据操作接口,减少数据操作的模板代码编写。
持久层的生产使用 MBG 也就是 MyBatis Generator ,数据操作行为使用 XML 描述。生成器 Runtime 使用 MyBatis3 。在这次的系统升级中发现 MBG 提供了 Kotlin 的支持(MyBatis3Kotlin),同时默认 Runtime 已从 MyBatis3 更改为 MyBatis3DynamicSql 。之前看了下动态 SQL 的介绍觉得有些细节不是很直观,现在看来动态 SQL 似乎要成为主流。后续了解一下。
1. 设计规范 要想做统一操作必须要首先制定规范,这个生成器的目的就是规范 DAO 和 PO,所以需要设计一个 DAO 和 PO 的顶层接口。
1 2 3 4 5 6 7 8 9 public abstract class BasePo implements IEntity { private Long id; private String creator; private Date createTime; }
如上述代码 BasePo 类定义一系列基本属性,如记录 id,记录创建时间,其它的如更改时间,更改人,版本号等。值得注意的是这里面的所有属性都是可有可无的,因为最终 SQL 是根据数据库实际表结构反转而来。无论添加任何多余元素都不会映射到最终的 SQL 语句,所以持久层之上的 Service 和 Controller 都可以不关注数据库设计,只注意框架规范即可。
1 2 3 4 5 6 7 8 9 10 11 12 13 14 15 16 17 18 19 20 21 public interface BaseMapper <Po extends BasePo > extends Mapper <BasePo>{ Po selectById (Serializable id) ; List<Po> selectQuery (IQuery query) ; int insert (Po po) ; int insertSelective (Po po) ; int updateSelectiveById (Po po) ; int updateByIdWithBlob (Po po) ; int updateById (Po po) ; int deleteById (Serializable id) ; Long countByCondition (BaseCondition condition) ; List<Po> selectByCondition (BaseCondition condition) ; List<Po> selectByConditionWithBlob (BaseCondition condition) ; int deleteByCondition (BaseCondition condition) ; int updateByCondition (@Param("record") BasePo po, @Param("example") BaseCondition condition) ; int updateByConditionSelective (@Param("record") BasePo po, @Param("example") BaseCondition condition) ; int updateByConditionWithBlob (@Param("record") BasePo po, @Param("example") BaseCondition condition) ;}
顶层的 Mapper 接口定义了 15 个数据操作接口,和 XxxMapper(Dao).xml 中的 XML 节点想对应。这其中的所有带 Blob 的方法只有在表结构存在大数据类型才会生产,如 blob, text, longtext 等。所有的 xxxCondition 原始方法为 XxxExample 这里也加以修改。由于修改了默认的 example 命名,那么也需要定义一个 Condition 接口表示数据操作条件。
1 2 3 4 5 6 7 8 9 10 11 12 13 14 15 16 17 18 19 20 21 22 23 24 25 26 27 28 29 30 public abstract class BaseCondition implements ICondition { public abstract ConditionCriteria or () ; public abstract ConditionCriteria createCriteria () ; public abstract void setOrderByClause (String orderByClause) ; public abstract String getOrderByClause () ; public abstract void setDistinct (boolean distinct) ; public abstract boolean isDistinct () ; } public interface ConditionCriteria { boolean isValid () ; ConditionCriteria andIdIsNull () ; ConditionCriteria andIdIsNotNull () ; ConditionCriteria andIdEqualTo (Long value) ; ConditionCriteria andIdNotEqualTo (Long value) ; ConditionCriteria andIdGreaterThan (Long value) ; ConditionCriteria andIdGreaterThanOrEqualTo (Long value) ; ConditionCriteria andIdLessThan (Long value) ; ConditionCriteria andIdLessThanOrEqualTo (Long value) ; ConditionCriteria andIdIn (List<Long> values) ; ConditionCriteria andIdNotIn (List<Long> values) ; ConditionCriteria andIdBetween (Long value1, Long value2) ; ConditionCriteria andIdNotBetween (Long value1, Long value2) ; }
有了这个 BaseCondition 抽象来和 ConditionCriteria 接口就可以在更高的逻辑层做数据操作的抽象。在上面这些规范下修改 MBG 的生产规范即可。
2. 代码生成
这里不使用 MBG 的其他功能,只依赖 mybatis-generator-core 。
1
2
3
4
dependencies { implementation "org.mybatis:mybatis:3.5.11" implementation "org.mybatis.generator:mybatis-generator-core:1.4.2" }
MBG 的代码生产非常简单,只需要编写自己的生产配置文件 generatorConfig.xml 即可。
1
2
3
4
5
6
7
8
List<String> warnings = new ArrayList <String>(); boolean overwrite = true ;File configFile = new File ("generatorConfig.xml" );ConfigurationParser cp = new ConfigurationParser (warnings);Configuration config = cp.parseConfiguration(configFile);DefaultShellCallback callback = new DefaultShellCallback (overwrite);MyBatisGenerator myBatisGenerator = new MyBatisGenerator (config, callback, warnings);myBatisGenerator.generate(null );
如上述代码所示,配置文件最终生产 org.mybatis.generator.config.Configuration 实例,再调用 MyBatisGenerator#generate 即可生成代码。那么这里的核心就是 Configuration ,如果我们自己生产就可以抛弃配置文件 "generatorConfig.xml 。不过这么做又要牵扯到 MBG 的许多内部细节,本文不做详细介绍。
现在生产代码的核心就是这个 generatorConfig.xml 文件了,这个文件的说明可以参见官方文档 MyBatis GeneratorXML Configuration File Reference ,已经做了相关说明。但是这个文件毕竟是静态信息,我们如何动态生产呢?最好的方法就是将这个文件使用模板引擎渲染出来。
2.1 渲染配置文件 为了便于修改 MBG 的内部配置,我们首先需要写一个 Runtime 覆盖掉 MyBatis3 的一些默认设置:
1
2
3
4
5
6
public class XxxIntrospectedTableMyBatis3Impl extends IntrospectedTableMyBatis3Impl { @Override protected AbstractJavaClientGenerator createJavaClientGenerator () { return new XxxJavaMapperGenerator (getModelProject()); } }
然后使用 XxxIntrospectedTableMyBatis3Impl 覆盖掉生成配置中 targetRuntime 属性对应的 MyBatis3 这个值。替换后的生成器配置文件如下(freemaker 模板):
1
2
3
4
5
6
7
8
9
10
11
12
13
14
15
16
17
18
19
20
21
22
23
24
25
26
27
28
29
30
31
32
33
34
35
36
37
38
39
40
41
42
43
44
45
46
47
48
49
50
51
52
53
54
55
56
57
58
59
60
61
62
63
64
65
66
67
68
69
70
71
<?xml version="1.0" encoding="UTF-8" ?> <!DOCTYPE generatorConfiguration PUBLIC "-//mybatis.org//DTD MyBatis Generator Configuration 1.0//EN" "http://mybatis.org/dtd/mybatis-generator-config_1_0.dtd" > <generatorConfiguration > <context id ="mysql_table" targetRuntime ="com.xxx.cloud.code.gen.runtime.XxxIntrospectedTableMyBatis3Impl" defaultModelType ="flat" > <property name ="beginningDelimiter" value ="`" /> <property name ="endingDelimiter" value ="`" /> <property name ="javaFileEncoding" value ="UTF-8" /> <property name ="javaFormatter" value ="org.mybatis.generator.api.dom.DefaultJavaFormatter" /> <property name ="xmlFormatter" value ="org.mybatis.generator.api.dom.DefaultXmlFormatter" /> <plugin type ="org.mybatis.generator.plugins.RenameExampleClassPlugin" > <property name ="searchString" value ="Example$" /> <property name ="replaceString" value ="Condition" /> </plugin > <plugin type ="com.xxx.cloud.code.gen.plugins.XxxFrameworkPlugin" > </plugin > <commentGenerator type ="com.xxx.cloud.code.gen.plugins.XxxCommentGenerator" > <property name ="addRemarkComments" value ="true" /> </commentGenerator > <jdbcConnection driverClass ="${datSourceTemplate.driverClass}" connectionURL ="${datSourceTemplate.url}" userId ="${datSourceTemplate.userName}" password ="${datSourceTemplate.password}" /> <javaTypeResolver type ="com.xxx.cloud.code.gen.plugins.XxxJavaTypeResolver" > <property name ="forceBigDecimals" value ="false" /> </javaTypeResolver > <javaModelGenerator targetPackage ="${javaModeTemplate.targetPackage}" targetProject ="${javaModeTemplate.targetProject}" > <property name ="trimStrings" value ="${javaModeTemplate.trimStrings}" /> <property name ="rootClass" value ="${javaModeTemplate.rootClass}" /> </javaModelGenerator > <sqlMapGenerator targetPackage ="${sqlMapTemplate.targetPackage}" targetProject ="${sqlMapTemplate.targetProject}" > <property name ="enableSubPackages" value ="true" /> </sqlMapGenerator > <javaClientGenerator type ="${javaClientTemplate.type}" targetPackage ="${javaClientTemplate.targetPackage}" targetProject ="${javaClientTemplate.targetProject}" > <property name ="enableSubPackages" value ="true" /> <property name ="rootInterface" value ="${javaClientTemplate.rootInterface}" /> </javaClientGenerator > <#list tableTemplates as table> <table tableName ="${table.tableName}" <#if table.catalog ??> catalog="${table.catalog}" </#if> <#if table.schema??> schema="${table.schema}" </#if> domainObjectName="${table.domainObjectName}" mapperName="${table.mapperName}"> </table > </#list> </context > </generatorConfiguration >
如上述 XML 配置所示,增加了如下自定义配置:
XxxIntrospectedTableMyBatis3Impl :Runtime 的属性值。配置文件的信息就是为了配置这个 Runtime 使用的。现在继承了 IntrospectedTableMyBatis3Impl 就可以修改配置流程了。XxxFrameworkPlugin :这个是官方的插件 org.mybatis.generator.api.PluginAdapter 的子类,目的是为了访问 IntrospectedTable 实例。XxxCommentGenerator :注释生成器,继承了 org.mybatis.generator.api.CommentGenerator ,可参考默认 DefaultCommentGenerator 实现。XxxJavaTypeResolver :数据库与 Java 类型映射工具 org.mybatis.generator.api.JavaTypeResolver ,为了方便期间继承其子类 JavaTypeResolverDefaultImpl 就好了,只需要替换掉一些默认的映射关系即可。比如修改 SMALLINT , BIGINT 对应的 Java 类型。
2.2 修改增强生成 如最开始的规范所示,这里要增加 DAO 的父类实现默认行为。添加 PO 的父类以便为框架层提供支持,修改默认的 DAO 的方法,以及统一条件查询。这里需要注意配置文件的三个节点:
javaModelGenerator :PO(实体)的生成器配置,由于这里没有更多的要求,直接增加一个 rootClass 属性对应一个父类就可以了。sqlMapGenerator :XML Mapper 生成配置,这里也不要额外配置。javaClientGenerator :就是 DAO(XxxMapper)的生成配置,向 DAO 接口增加一个父接口。(升级后失效了,排查后修改)
那么现在有两个问题,一个是修改 XML Mapper 中的节点,一个是删除掉 XxxMaper.java 中的所有默认方法(因为在父接口中存在了)。
修改 XML 节点
这点比较容易,因为节点名称都是 IntrospectedTable 中的一个属性值。那么最简单的方法就是实现一个插件获得 IntrospectedTable 实例。
1
2
3
4
5
6
7
8
9
10
11
12
13
14
15
16
17
18
19
20
21
22
23
24
25
26
27
28
29
30
31
32
33
34
35
36
37
38
39
40
41
42
43
44
45
46
47
48
49
public class XxxFrameworkPlugin extends PluginAdapter { @Override public void initialized (IntrospectedTable introspectedTable) { introspectedTable.setSelectByPrimaryKeyStatementId("selectById" ); introspectedTable.setInsertSelectiveStatementId("insertSelective" ); introspectedTable.setUpdateByPrimaryKeyStatementId("updateById" ); introspectedTable.setUpdateByPrimaryKeySelectiveStatementId("updateSelectiveById" ); introspectedTable.setUpdateByPrimaryKeyWithBLOBsStatementId("updateByIdWithBlob" ); introspectedTable.setDeleteByPrimaryKeyStatementId("deleteById" ); introspectedTable.setCountByExampleStatementId("countByCondition" ); introspectedTable.setDeleteByExampleStatementId("deleteByCondition" ); introspectedTable.setSelectByExampleStatementId("selectByCondition" ); introspectedTable.setSelectByExampleWithBLOBsStatementId("selectByConditionWithBlob" ); introspectedTable.setUpdateByExampleStatementId("updateByCondition" ); introspectedTable.setUpdateByExampleSelectiveStatementId("updateByConditionSelective" ); introspectedTable.setUpdateByExampleWithBLOBsStatementId("updateByConditionWithBlob" ); introspectedTable.setExampleWhereClauseId("Condition_Where_Clause" ); introspectedTable.setMyBatis3UpdateByExampleWhereClauseId("Update_By_Condition_Where_Clause" ); introspectedTable.setResultMapWithBLOBsId("ResultMapWithBlob" ); introspectedTable.getTableConfiguration().getProperties().setProperty(PropertyRegistry.ANY_ROOT_INTERFACE, "com.xxx.framework.dao.mapper.BaseMapper" ); } @Override public boolean modelExampleClassGenerated (TopLevelClass topLevelClass, IntrospectedTable introspectedTable) { FullyQualifiedJavaType baseExampleType = new FullyQualifiedJavaType ("com.xxx.cloud.common.model.condition.BaseCondition" ); topLevelClass.setSuperClass(baseExampleType); topLevelClass.addImportedType(baseExampleType); FullyQualifiedJavaType conditionCriteriaType = new FullyQualifiedJavaType ("com.xxx.cloud.common.model.condition.ConditionCriteria" ); topLevelClass.addImportedType(conditionCriteriaType); List<InnerClass> innerClasses = topLevelClass.getInnerClasses(); for (InnerClass innerClass : innerClasses) { if ("GeneratedCriteria" .equals(innerClass.getType().getShortName())){ innerClass.addSuperInterface(conditionCriteriaType); } System.err.println(innerClass.getType()); } return super .modelExampleClassGenerated(topLevelClass, introspectedTable); } }
这个插件在配置文件中增加一个 <plugin> 节点即可生效,这个插件有两个作用:
把 XML 中的方法节点名称修改为框架的顶层接口名,进而可以把 DAO 的方法对应过去。
将条件对象增加一个父类 BaseCondition 内部类也增加 ConditionCriteria 这个父类
DAO 父类问题
DAO 的父类由于带有泛型需要额外处理,这就是我们要覆盖掉默认 IntrospectedTableMyBatis3Impl 的原因。DAO 的生成对应的是 JavaClientGenerator ,那么只需要覆盖掉 IntrospectedTableMyBatis3Impl#createJavaClientGenerator():AbstractJavaClientGenerator 方法返回我们自己的 JavaClientGenerator 即可。
1 2 3 4 5 6 7 8 9 10 11 12 13 14 15 16 17 18 19 20 21 22 23 24 protected AbstractJavaClientGenerator createJavaClientGenerator () { if (context.getJavaClientGeneratorConfiguration() == null ) { return null ; } String type = context.getJavaClientGeneratorConfiguration() .getConfigurationType(); AbstractJavaClientGenerator javaGenerator; if ("XMLMAPPER" .equalsIgnoreCase(type)) { javaGenerator = new JavaMapperGenerator (getClientProject()); } else if ("MIXEDMAPPER" .equalsIgnoreCase(type)) { javaGenerator = new MixedClientGenerator (getClientProject()); } else if ("ANNOTATEDMAPPER" .equalsIgnoreCase(type)) { javaGenerator = new AnnotatedClientGenerator (getClientProject()); } else if ("MAPPER" .equalsIgnoreCase(type)) { javaGenerator = new JavaMapperGenerator (getClientProject()); } else { javaGenerator = (AbstractJavaClientGenerator) ObjectFactory.createInternalObject(type); } return javaGenerator; }
这里可以看到针对 Java 版本的 DAO ,对应实现是在 JavaMapperGenerator 中。那么参考一下 JavaMapperGenerator 的实现自己写一个:
1 2 3 4 5 6 7 8 9 10 11 12 13 14 15 16 17 18 19 20 21 22 23 24 25 26 27 28 29 30 31 32 33 34 35 36 37 38 39 40 public class XxxJavaMapperGenerator extends AbstractJavaClientGenerator { @Override public List<CompilationUnit> getCompilationUnits () { progressCallback.startTask(getString("Progress.17" ,introspectedTable.getFullyQualifiedTable().toString())); CommentGenerator commentGenerator = context.getCommentGenerator(); FullyQualifiedJavaType type = new FullyQualifiedJavaType (introspectedTable.getMyBatis3JavaMapperType()); Interface interfaze = new Interface (type); interfaze.setVisibility(JavaVisibility.PUBLIC); commentGenerator.addJavaFileComment(interfaze); String rootInterface = introspectedTable.getTableConfigurationProperty(PropertyRegistry.ANY_ROOT_INTERFACE); if (!stringHasValue(rootInterface)) { rootInterface = context.getJavaClientGeneratorConfiguration() .getProperty(PropertyRegistry.ANY_ROOT_INTERFACE); } if (stringHasValue(rootInterface)) { TableConfiguration tableConfiguration = introspectedTable.getTableConfiguration(); String superText = rootInterface + "<" + tableConfiguration.getDomainObjectName() + ">" ; String targetPackage = context.getJavaModelGeneratorConfiguration().getTargetPackage(); String domainImport = targetPackage + "." + tableConfiguration.getDomainObjectName(); interfaze.addSuperInterface(new FullyQualifiedJavaType (superText)); interfaze.addImportedType(new FullyQualifiedJavaType (rootInterface)); interfaze.addImportedType(new FullyQualifiedJavaType (domainImport)); } List<CompilationUnit> answer = new ArrayList <CompilationUnit>(); if (context.getPlugins().clientGenerated(interfaze, introspectedTable)) { answer.add(interfaze); } return answer; } }
这里只需要关注 getCompilationUnits():List<CompilationUnit> 方法。
将 rootInterface 这个父接口取出,将 PO 作为泛型重新拼装出一个父接口。再把各种 DAO 的默认方法全部删掉。那么最终的生成结果如下
1 2 3 4 5 6 7 8 9 10 11 12 13 14 15 16 17 18 public interface Oauth2RegisteredClientDao extends BaseMapper <Oauth2RegisteredClientPo> {} public class Oauth2RegisteredClientPo extends BasePo { } public class OauthClientInfoPoCondition extends BaseCondition { protected String orderByClause; protected boolean distinct; protected List<Criteria> oredCriteria; protected abstract static class GeneratedCriteria implements ConditionCriteria { protected List<Criterion> criteria; } }
如上述代码所示持久层会生产三个 Java 文件以及一个 XML 文件。日常使用的是 Oauth2RegisteredClientDao 这个数据操作接口(运行起来会生成代理对象)。而 Oauth2RegisteredClientDao 这个接口没有任何方法,所有的框架级别的数据操作都在父接口 BaseMapper<Oauth2RegisteredClientPo> 中。Oauth2RegisteredClientDao 接口存在的目的是实现自定义逻辑(写自己的方法),这些逻辑对应的 XML 文件最好单独写一个并将 mapper 指向当前接口。那么在运行起来后多个 XML mapper 文件就会合并起来,最终目的就是将框架层的 XML 与自定义 XML 分割开来。
Oauth2RegisteredClientDao :空 DAO,为的是添加定义行为(SQL)。Oauth2RegisteredClientPo :持久化对象。OauthClientInfoPoCondition :PO 对应的查询条件。Oauth2RegisteredClientDao.xml :XMl Mapper 文件,如果改成动态 SQL 这个就没有了。Oauth2RegisteredClientDaoExt.xml :不存在,需要的话自己新建。里面的东西是 Oauth2RegisteredClientDao 自己的实现,单独写在这里。
2.3 更高层的代码生产 上面章节中,已经使用 MBG 按照我们自己的要求生成了框架级别的持久化层。如果系统分层严格,持久化层被专门的业务层调用,那么做到这些就足够了。但是如何快速的之通过一个设计好的数据库表格生产全套 MVC 模板代码呢?也就是说直接生成到 restful 接口,形成最基础的数据从操作功能呢?这一切的基础是IntrospectedTable 。
1
2
3
4
5
6
7
8
9
10
11
List<String> warnings = new ArrayList <String>(); boolean overwrite = true ;File configFile = new File ("generatorConfig.xml" );ConfigurationParser cp = new ConfigurationParser (warnings);Configuration config = cp.parseConfiguration(configFile);DefaultShellCallback callback = new DefaultShellCallback (overwrite);MyBatisGenerator myBatisGenerator = new MyBatisGenerator (config, callback, warnings);myBatisGenerator.generate(null ); List<IntrospectedTable> introspectedTables = configuration.getContexts().get(0 ).getIntrospectedTables()
如上述基本生成器代码,在生成完成后通过 Configuration -> Context -> IntrospectedTable 获得数据库表的详细信息。这些势力都是在 MyBatisGenerator#generate() 完成后才存在,是从数据库的元数据中获得的。而有了这个就可以通过模板引擎生成从 web 接口到数据库的所有代码,当然是最基础的模板代码。当然了这一切的前提还是要有一个总的框架规范,甚至是写一个自己的 xxx-framework 才有意义。
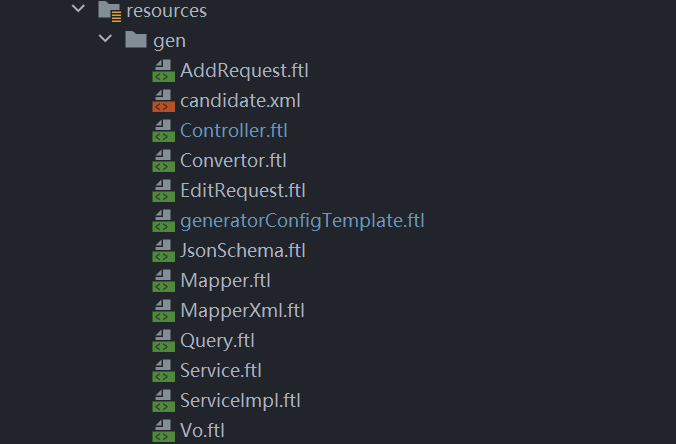
如上图所示,定义各个层级与操作的接口与规范,包括:添加 bean(AddRequest.ftl),修改 bean(EditRequest.ftl),查询 bean(Query.ftl),返回 bean(Vo.ftl),controller 层(Controller.ftl),service 层(Service.ftl/接口,ServiceImpl.ftl/实现),再加上上面提到的持久层。
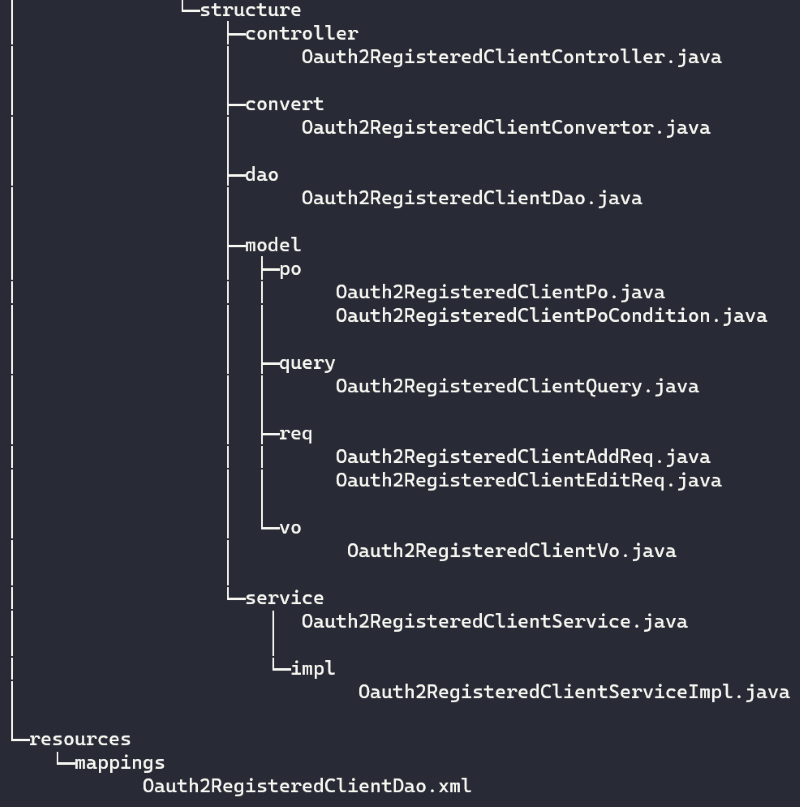
在此基础上的通用框架 xxx-framework 实现每一个层级的基本操作(接口或父类),最终实现上图的生成结果。需要强调的是层级模板并不是生成的关键,关键的地方是每一层几乎都要求框架支持(这个长期迭代产生的)。
这最终达到的效果是拿着最初设计的数据库脚本,所有相关功能可以直接开始同步实现(前端的代码生成器这里就不多说了)。在没有添加额外业务的前提下,所有流程几乎一遍通过。在很多时候我在设计玩数据库时,是先着手前端实现。因为前端可以直观的暴露出可能考虑欠缺的部分,如果有再调整数据库设计。当前端基本功能完成后,再通过生成器产生后端代码。一遍通过。
3. 封装生成器 为了能实际用起来,上面说了那么多需要封装出一套 API 出来。内部实现可能要考虑好多东西,但是用起来会方便很多,如下:
1
2
3
4
5
6
7
8
9
10
11
12
13
14
15
16
17
18
19
20
21
XxxGenConfiguration xxxGenConfiguration = new XxxGenConfiguration ();xxxGenConfiguration.setTargetPath("local_path" ); xxxGenConfiguration.setDataSourceUrl("jdbc:mysql://127.0.0.1:3306/xxxxxxx?useInformationSchema=true" ); xxxGenConfiguration.setDataSourceDriverClass("com.mysql.jdbc.Driver" ); xxxGenConfiguration.setDataSourceUserName("---" ); xxxGenConfiguration.setDataSourcePassword("---" ); xxxGenConfiguration.setDocumentAuthor("---" ); xxxGenConfiguration.setDocumentVersion("---" ); TemplateDocument templateDocument = new TemplateDocument ();templateDocument.setAuthor("---" ); templateDocument.setVersion("---" ); templateDocument.setDate(XxxDateFormatUtils.format(new Date ())); xxxGenConfiguration.setDocument(templateDocument); xxxGenConfiguration.addModuleConfiguration(XxxGenModuleConfiguration .builder("com.xxx.sso.structure" , "Oauth2RegisteredClient" , "sso_oauth2_registered_client" ) .modulePrefix("/oauth2-client" ).moduleName("注册客户端管理" ) .moduleCode("oauth2-client" ).build()); XxxCloudCodeGenHelper.generateProject(xxxGenConfiguration);
也就是只需一个全局配置类 XxxGenConfiguration ,以及子模块配置类 XxxGenModuleConfiguration 就可以通过模板渲染出 MVC 模板代码。
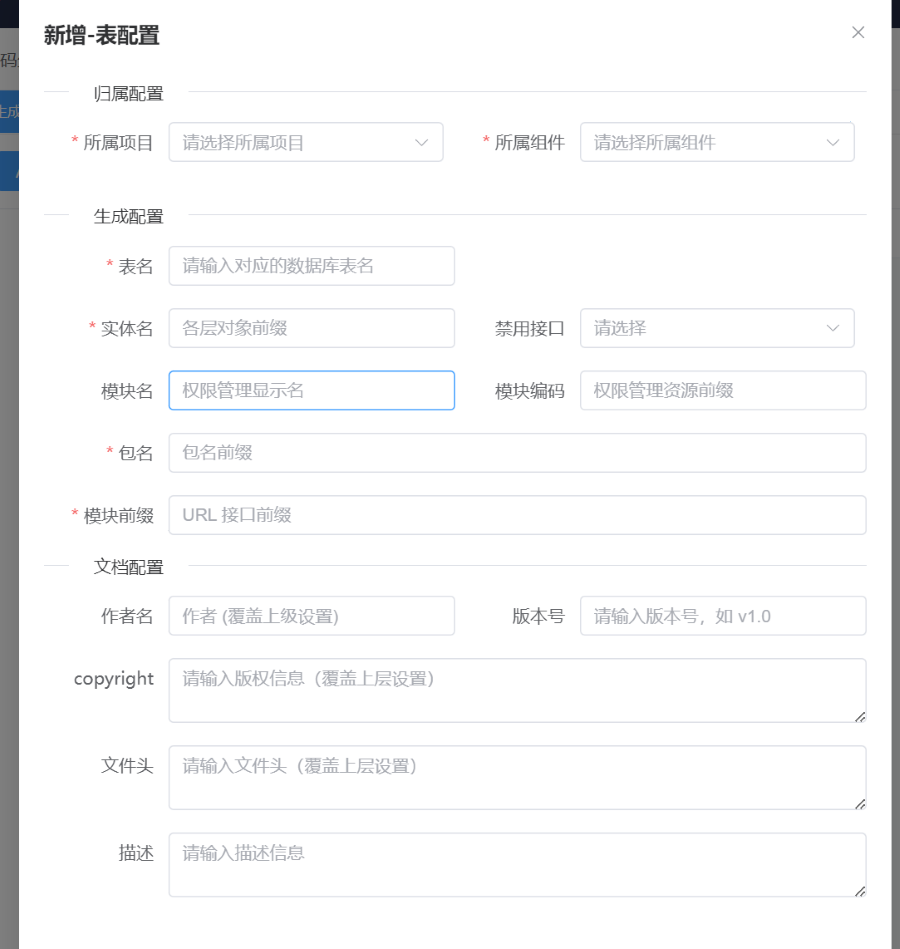
再进一步,为了方便使用将这一系列配置信息在一个对话框中配置好,点击生产代码。
